
A few months ago I sang the praises of BillFlash for an entire article (you can read it here); I don't regret it! But the reality is, in order to make BillFlash most effective, in order to make any statements in Medisoft most effective, there are a few advanced features you should be taking advantage of.
Statement Management
If you aren't using Statement Management to use your statements, you need to start. It's been around for a decade and without it, there is no managing your statements at all. Statement Management allows you to track how old your statements are and most importantly the number of times they have been sent. You can customize the grid to show you the balance of each statement, the Submission Count, and the Days Old. Back in my training days, every time I added Days Old to the grid for the first time, we would see statements over 1,000 days old. That's why you need Statement Management. If you aren't using it yet, buy an hour of training with Kim and get it up and running; it will be worth it.
Submission Count
How many times do you send the exact same statement? 2? 4? 18? Sadly, that last number isn't a joke. If you aren't tracking how many times your statements are going out, then you are probably wasting a ton of money on postage sending the same ones over and over again. In general, if a patient hasn't paid by the third statement, they probably are not going to. And if you are using Statement Management, you can make it happen automatically. Simply edit the statement in the Report Designer and add a filter for submission count. Here's how:
- After logging into Medisoft, click on the Reports menu and then the Design Custom Reports and Bills... menu item. The Medisoft Report Designer window will open.
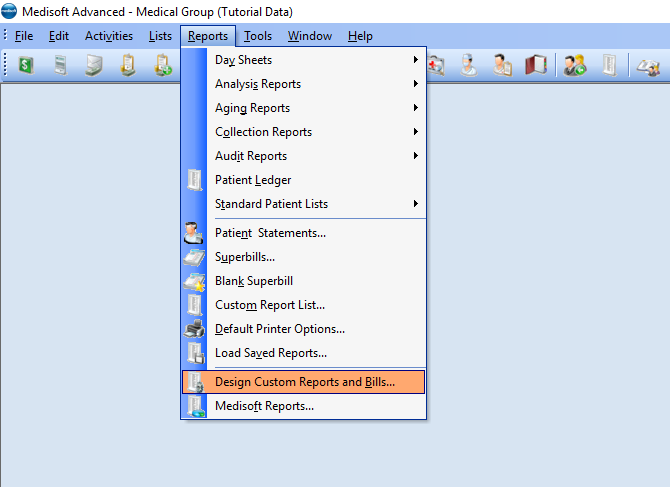
- In the Medisoft Report Designer window, click on the File menu and then the Open Report menu item.
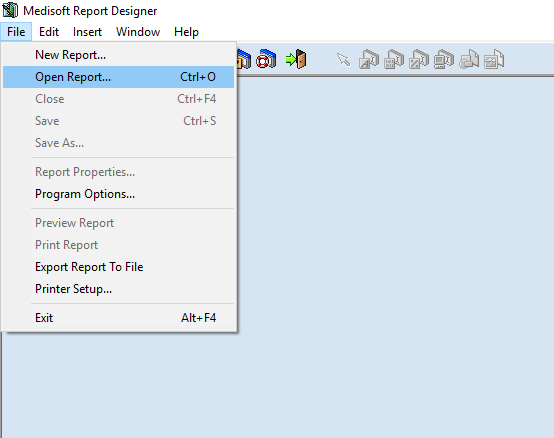
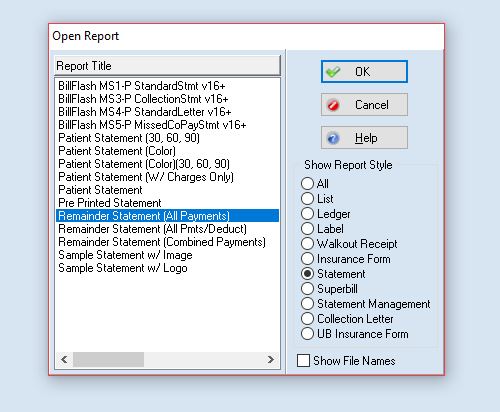
- In the Open Report window, select your statement from the list and click OK.
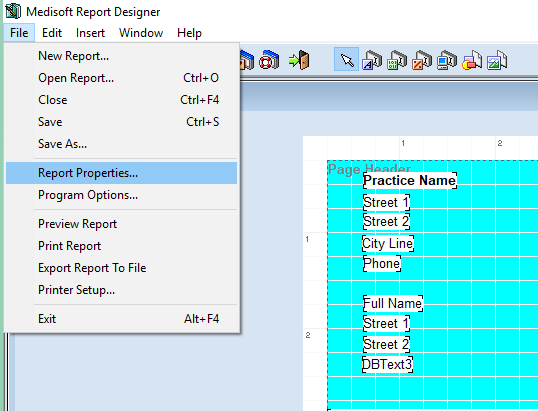
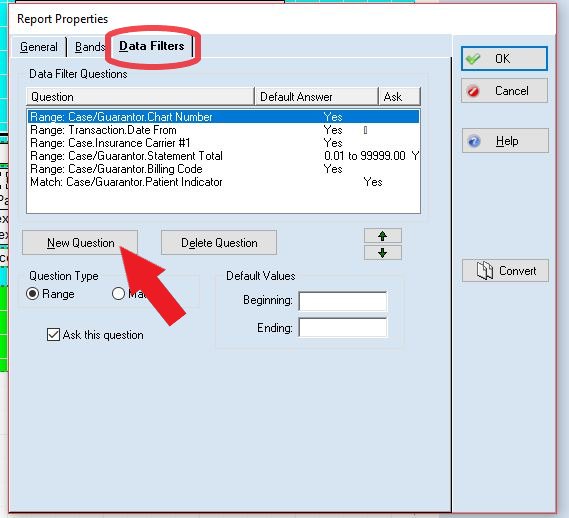
- Click on the File menu and then the Report Properties menu item.
- In the Report Properties window, click on the Data Filters tab.
- Click the New Question button.
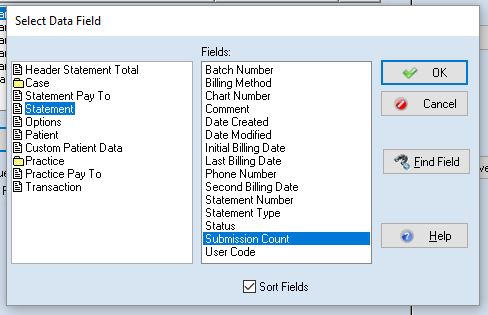
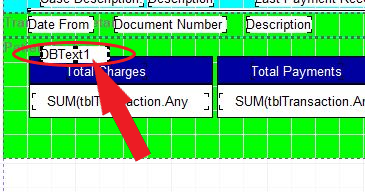
- In the Select Data Field window, click Statement in the left box and Submission Count in the right box. Click the OK button.
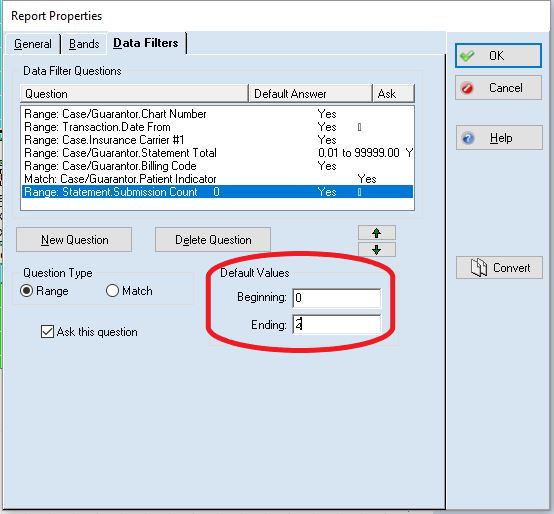
- Range: Statement: Submission Count will be highlighted in the list. In the lower, right side of the Report Properties window, under Default Values, there is a box labeled Beginning. In this box, type 0 (zero). In the box underneath, labeled Ending, type 2. Click the OK button.
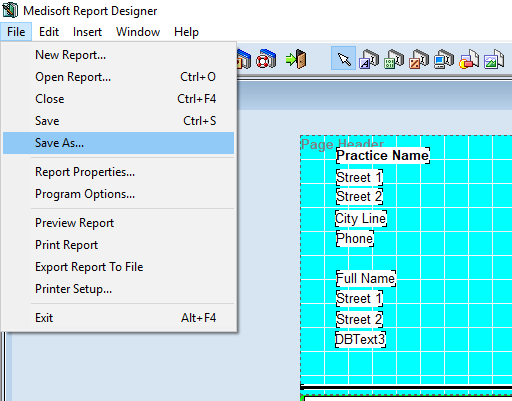
- Click on the File menu, then the Save As menu item. Give your statement a name - something so you know that it has submission count in it. **Pro Tip: if you put spaces at the beginning of the name, it will show up at the top of the list.
- Exit out and now you have a statement that will only run up to three statements - after that, it won't print anymore.
Dunning Messages
How would you like to have messages automatically appear in your statements, saying things like, "This balance is past due" or "FINAL NOTICE"? Assuming the previous activity didn't give you a heart attack, you can do it! But we have to go back into the Report Designer.
- Click on the Reports menu and then click on the Design Custom Reports and Bills... menu item. The Medisoft Report Designer window will open.

- Click the File menu, then click the Open Report menu item.
- In the Open Report window, select your statement from the list and then click OK.
- Click on the Insert menu and then click on the Data Field menu item (nothing happened, but it's ok)
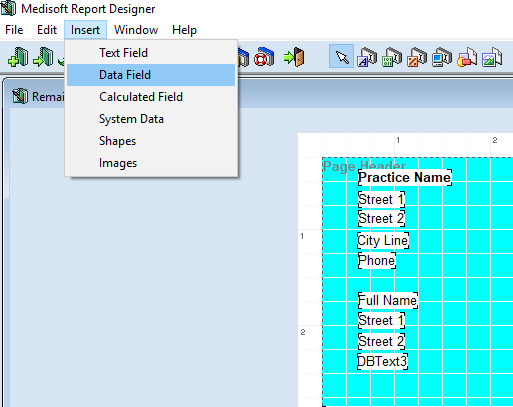
- Don't click anywhere yet, but look towards the bottom of the screen for the green section labeled Patient Footer.
- Double-click on the new field. The Data Fields Properties window should open.
- Click the New Expression button.

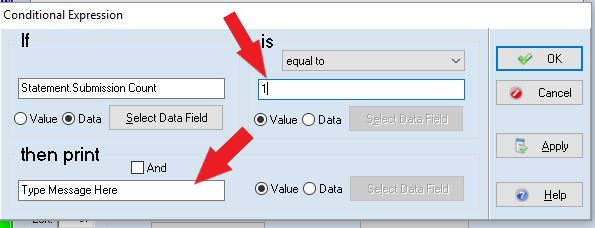
- Under the If box, click the Select Data Field button.
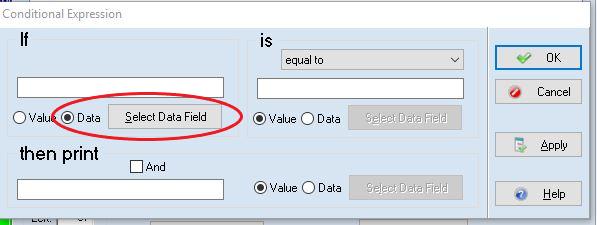
- In the Select Data Field window that opens, click Statement in the left box and click Submission Count in the right box. Click the OK button.
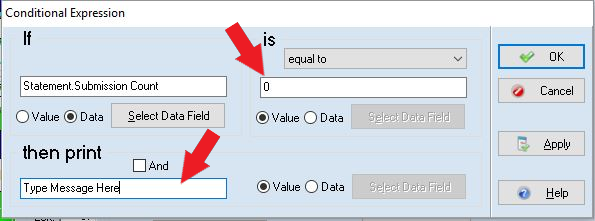
- In the Is box, type 0 (zero).
- In the Then Print box, type in the message you want to print on the first statement.
- Click OK.
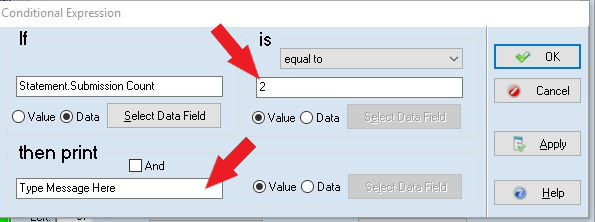
- Click the New Expression button.
- Under the If box, click the Select Data Field button.
- In the Select Data Field window that opens, click Statement in the left box and click Submission Count in the right box. Click the OK button.
- In the Is box, type in 1.
- In the Then Print box, type in the message you want to print on the second statement.
- Click the OK button.
- Click the New Expression button.
- Under the If box, click the Select Data Field button.
- In the Select Data Field window that opens, click Statement in the left box and click Submission Count in the right box. Click the OK button.
- In the Is box, type 2.
- In the Then Print box, type in the message you want to print on the third statement.
- Click the OK button.
- Click on the File menu and then the Save menu item.
- Exit
Now when you run your statements, your messages will automatically appear. No need to use stickers or write them out - let Statement Management do the heavy lifting for you!
If you want these features in place, but doing it yourself was too much, call and book some time with Kim. Back when she was a customer, she was the very first person I successfully walked through the Report Designer over the phone. 18 years later, she is quite the expert!